Client brief to final cut: workflow checklist for seamless event videos
A rock-solid event video workflow transforms scattered inputs into a polished final cut that delights clients and audiences alike. Suivez cette checklist étape par étape — de la réception du brief jusqu'à la livraison — pour réduire les retakes, garder les délais et maximiser la valeur de chaque prise.
1. Decode the client brief
Clarify goals, audience and success metrics
Begin every event video workflow with a discovery call. Ask what action viewers should take, which platforms will host the film and how performance will be measured (views, sign-ups, ticket sales). A detailed pre-production questionnaire captures these answers in writing and avoids later confusion.
Pin down creative references
- Request two videos the client loves and one they dislike.
- Note pacing, graphics, and tone keywords (e.g. “high-energy”, “minimalist lower thirds”).
- Confirm company fonts and colours to streamline motion-design later.
2. Build a bullet-proof pre-production plan

Pre-production is the invisible scaffolding that lets your crew improvise confidently on shoot day yet still hit every deliverable without overtime. When you blueprint camera angles against stage dimensions, map power drops, preload lower-third templates and rehearse cue points, you are in effect programming redundancy straight into the timeline. This foresight slashes risk, protects profit margins and frees creative brain-space to chase unexpected moments that make a highlight reel sing.
Create a run-of-show and shot list
Translate the event agenda into a run-of-show that details timing, speaker names and camera positions. Then expand it into a granular shot list that your crew can follow even if you are troubleshooting elsewhere.
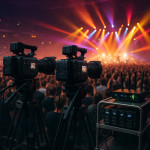
Gear matrix: matching shots to equipment
| Shot type | Recommended gear | Backup plan |
|---|---|---|
| Keynote wide | 4K camcorder + tripod | Secondary DSLR on balcony |
| Audience reactions | Mirrorless on gimbal | Static B-cam at 70 mm |
| Interview corner | Prime 35 mm + lav mic | Shotgun mic on boom |
| B-roll booths | Action cam + LED panel | Phone 4K + mini-light |
Redundancy is non-negotiable. Our gear-redundancy strategies article dives deeper into failsafe setups.
Logistics & crew briefing
- Distribute venue maps with load-in points and power outlets.
- Schedule a 30-minute audio line-check with the AV team.
- Collect signed location releases and music cue sheets.
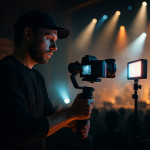
3. Production day: capture flawlessly
Adopt a “record-then-reset” mindset
After each segment, verify exposure, focus and audio peaks. Rotate memory cards to a data wrangler who backs them up to two drives on-site — a practice championed in our live-shoot risk management guide.
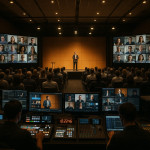
Communicate in 15-minute stand-ups
Quick huddles keep camera operators, audio techs and runners aligned. Use walkie-talkies or a dedicated Slack channel if the venue Wi-Fi is reliable.
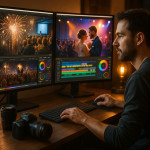
4. Post-production: from ingest to polished cut
Organise footage for speed
- Folder structure: 01_AUDIO, 02_CAMERA_A, 03_CAMERA_B, 04_GFX.
- Apply date and segment metadata on ingest to make proxy generation automatic.
- Synchronise multicam clips via timecode or audio waveforms.
Editing milestones
- String-out: chronological placement of usable footage.
- Rough cut: remove dead air, insert temporary graphics.
- Fine cut: polish pacing, colour-grade, and mix audio.
- Client review: provide watermarked link with time-coded comments.
Accelerate review cycles
Limit feedback rounds to two by attaching a checklist: brand spelling, lower-third titles, logo animations, and CTA placement. This tactic alone can trim delivery time by 25 % according to the 2023 State of Video Marketing Report (Wyzowl).
5. Delivery, distribution & archival
- Export platform-specific masters: 3840×2160 for YouTube, 1080×1920 vertical for Reels.
- Embed closed captions to improve accessibility and SEO.
- Upload to a cloud library tagged with event name, year and usage rights.
- Pitch a footage repurposing roadmap to the client to extend ROI.
Planners looking to outsource future shoots can browse our curated list of event videographers to secure proven talent quickly.
Mini-quiz: test your workflow savvy
FAQ
- How long does an average event video workflow take?
- For a one-day conference, expect one week of pre-production, one day of filming and two weeks of post-production, assuming two review rounds.
- Which editing software best fits multicam event projects?
- Adobe Premiere Pro and DaVinci Resolve both offer robust multicam sync. Choose the one your colourist or motion-designer already masters to avoid extra renders.
- What's the ideal resolution for future-proofing footage?
- Shoot in 4K even if delivery is 1080p. You gain reframing flexibility and prepare assets for future platforms with higher pixel density.
Ready to roll?
Apply this event video workflow checklist on your next project, and watch client approvals speed up while your creative energy stays focused on storytelling. Need a crew or extra gear? Reach out — our team loves turning complex events into cinematic highlights.