Studio ventilation and kiln upkeep: the safety protocol glass artists need
Poor air circulation and a neglected kiln can turn a thriving glass studio into a health hazard overnight. This guide walks you through proven studio ventilation strategies, a kiln-care calendar and practical cost benchmarks so you can protect your lungs, your artwork and your bottom line.
Why proper studio ventilation is non-negotiable
Molten glass releases metal oxides, fine silica and sometimes lead vapours. Without targeted studio ventilation, these particles remain airborne for hours, exposing you, visiting clients and even neighbouring tenants to respiratory illness, heavy-metal poisoning and chronic fatigue.
Key pollutants glass artists face
- Silica dust (<5 µm) – generated while cold-working and devitrifying.
- Lead & cadmium fumes – released from coloured frit and enamels above 480 °C.
- Carbon monoxide – produced by gas or raku kilns without complete combustion.
- NoX & SO2 gases – created when firing sulphur-bearing glasses.
OSHA action levels for respirable silica start at 25 µg/m³ averaged over 8 hours. Spot checks in cramped studios regularly peak above 150 µg/m³ when grinders run without capture hoods.
What regulations say
In most regions you must meet general duty-of-care ventilation requirements. While full industrial-hygiene audits are rare for small ateliers, insurance carriers increasingly request evidence of:
- Air exchange rates ≥ 6 ACH for hot-work zones
- Local exhaust ventilation (LEV) rated at 100–150 CFM per square foot of kiln lid
- Documented kiln maintenance logs covering element, relay and thermocouple checks
Failure to comply can void coverage and stall grants like those described in our grant-proposal secrets for glass innovators.
Designing a studio ventilation system that works
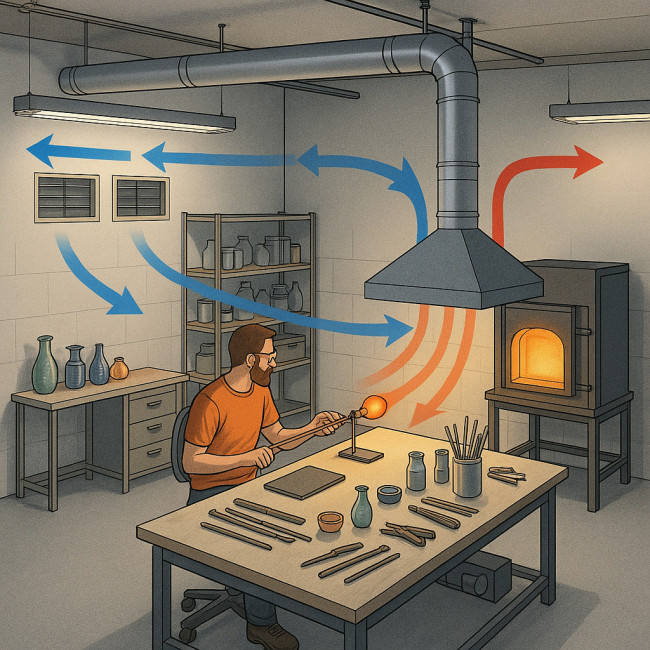
Whether you rent a converted warehouse or work from a spare garage, the air inside your studio should travel in one deliberate direction. Visualise a gentle river of fresh oxygen entering just behind your shoulder, sweeping over the bench, catching volatile vapours the instant they leave the molten glass and disappearing straight into a steel canopy. This single-pass pathway keeps toxic build-up near zero, prevents fogging on camera lenses when you film process videos, and stops heat from pooling around your ankles during marathon casting sessions. By engineering the flow early on, you also reduce energy bills because conditioned air spends only seconds in the hot zone before exit, instead of lingering and forcing air-conditioning units into overtime.
Start with a push-pull layout
Place fresh-air intakes behind the artist and extraction hoods in front of the kiln or torch bench. The air should cross your breathing zone once and exit, rather than recirculate.
Calculate the right airflow (CFM)
Use this rule of thumb: CFM = Kiln lid area (ft²) × 100. For a 24 in × 24 in kiln (4 ft²), you need roughly 400 CFM of dedicated exhaust. Round up if you regularly fire leaded glass.
| Kiln internal volume | Minimum exhaust (CFM) | Typical hood size |
|---|---|---|
| 0.05 m³ (small beehive) | 200 | 30 cm round |
| 0.1 m³ | 350 | 40 cm square |
| 0.2 m³ | 600 | 50 cm square |
| 0.4 m³ | 1 000 | 70 cm square |
Choose the right filters
While HEPA cartridges catch fine silica, they do not remove gas-phase lead fumes. Pair them with activated-carbon modules rated for heavy metals. Change filters every 400 hours or sooner if you notice odours during ramp-down.
Ventilation budgeting tips
- Install a variable-speed fan to lower noise during annealing cycles.
- Use rigid rather than flexi-ducts; airflow loss drops by 15 %.
- Apply reflective foil tape on duct seams to protect against radiant heat.
Studios that upgraded to proper LEV reported 28 % lower scrap rates in their limited-edition glass runs because devitrification decreased sharply.
Kiln upkeep: a calendar that prevents costly downtime
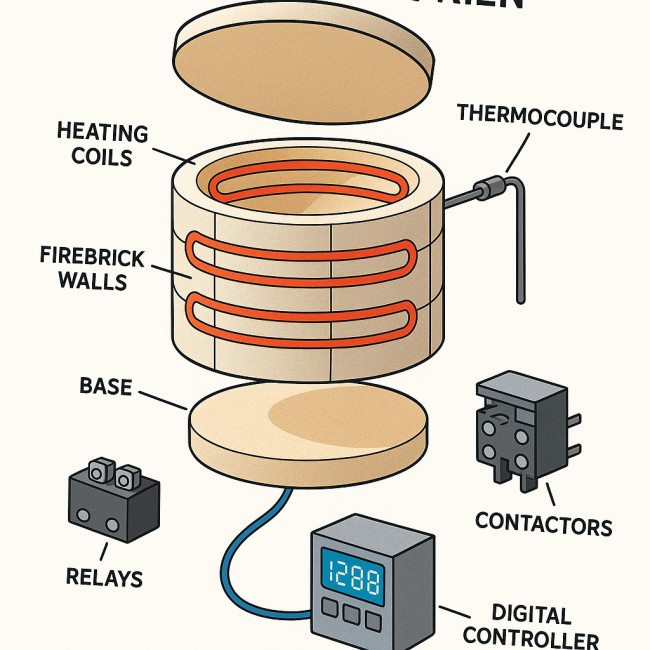
Inside the kiln, every component behaves like a domino in a tightly sequenced circuit. If the thermocouple drifts by even 20 °C, the controller over-fires, coils sag, bricks crumble and intricate moulds can warp beyond recovery. A disciplined maintenance routine breaks that cascade before it begins: you measure coil resistance, log the numbers in a spreadsheet, photograph bricks for comparison, vacuum silica dust before it vitrifies onto the floor and verify that relays click with crisp precision. Ten focused minutes at the end of a firing cycle can protect a commission worth thousands and, more importantly, preserve your reputation with galleries that expect flawless delivery schedules.
Your kiln is a controlled volcano. Skipping one element check can lead to uneven heating, stress cracks and even fire. Below is a practical maintenance cadence you can print and pin next to your firing log.
Daily checklist
- Inspect door seal for debris – wipe with a damp cotton cloth.
- Verify ventilation dampers move freely.
- Log start/stop temperatures and any unusual smells.
Weekly routine
- Vacuum kiln floor and walls with a HEPA shop-vac.
- Visually check elements for hot spots or sagging coils.
- Test thermocouple offset by comparing controller reading with a secondary pyrometer.
Monthly deep-dive
- Measure element resistance using a multimeter (±10 % of spec).
- Tighten relay screws; vibration loosens them over time.
- Remove kiln-sitter rod and clear glaze splatters.
Annual service items
| Task | Average cost (USD) | Time required |
|---|---|---|
| Replace all elements | $180–$350 | 3 h |
| New relays & contactors | $60–$120 | 1 h |
| Controller firmware update | $0–$50 | 30 min |
| Firebrick patching kit | $35 | 45 min |
Keeping receipts and photos inside a cloud folder impresses corporate collectors browsing your professional glass-artist profile and reassures them that their commissions won't be delayed by equipment failure.
Cost–benefit snapshot: ventilation & upkeep over five years
Source : OSHA Field Studies
Installing a full LEV with carbon filtration costs around $2 800. Over five years, artists report 40 % fewer sick days and lower rejection rates, easily offsetting the upfront expense.
Integrate safety into your creative workflow
Make ventilation checks as automatic as sketching a new vessel. Before every firing session:
- Turn on the exhaust 10 minutes before ramp-up.
- Verify airflow with a handheld anemometer – aim for rated CFM ±5 %.
- Note the reading in your digital firing log.
When pitching to galleries, reference your safety protocol in process notes. Artists who do so, like those highlighted in story-driven glass case studies, often clinch large-scale installations because curators see lower risk.
Quick self-assessment quiz
FAQ
- Can I just open windows instead of installing LEV?
- Natural ventilation dilutes fumes but doesn't capture them. LEV removes contaminants at the source, keeping exposure below legal limits even on windless days.
- Do small microwave kilns need ventilation?
- Yes. Even 800 W microwave kilns release lead and sulphur gases. A desktop hood rated at 150 CFM is sufficient.
- How long do kiln elements last?
- With monthly resistance checks and proper ventilation, elements last 120–180 firings. High-lead projects reduce life by 20 %.
- Is a downdraft vent better than an overhead hood?
- Downdraft vents excel at capturing heavy metal fumes that sink as they cool. Combine both for kilns larger than 0.3 m³.
- Can improved ventilation affect colour quality?
- Absolutely. Removing sulphur fumes prevents unwanted redox reactions, giving you brighter yellows and cleaner whites.
Ready to elevate safety and artistry? Schedule your first LEV airflow test this week and mark kiln upkeep dates in your calendar. Your lungs, clients and creative output will thank you.