Fresh ceramics visuals: photographing new pieces to captivate online recruiters
You poured hours into throwing, trimming, and glazing—now those fresh ceramics need visuals that stop recruiters mid-scroll. This guide shows you how to plan, shoot, and publish images that transmit texture, scale, and craftsmanship instantly, lifting your shortlist rate on talent directories and portfolio sites.
1. Understand what online recruiters look for
Procurement managers, interior architects, and gallery scouts browse hundreds of thumbnails per session. They pause on visuals that:
- Show true colour and sheen without glare.
- Reveal scale through smart props or hand shots.
- Highlight unique surface details like speckled glazes or carved patterns.
- Load fast and crop well into square or 4:5 previews.
In short, your photo has to work both as a tiny icon and as a full-screen image. Recruiters decide in five seconds whether to click your profile or move on.
2. Prepare pieces and studio before the shoot
Clean and cure
Remove kiln dust, fingerprints, and loose glaze particles with a lint-free cloth. Allow freshly glazed items to cool for 48 hours to avoid condensation rings during shooting.
Curate a cohesive series
Pick 5 – 9 pieces that tell one story: same glaze family, complementary forms, or a process timeline. Cohesion helps algorithms group images and boosts the narrative flow once visitors land on your latest craft portfolios page.
3. Lighting fundamentals for ceramics
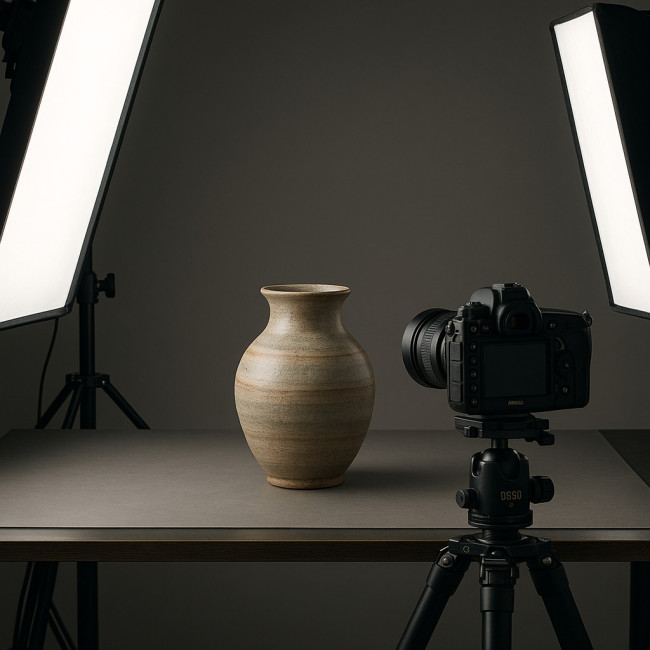
Ceramics are unforgiving: glossy glazes produce hotspots while matte finishes swallow detail, so you need a lighting plan that flatters both. Picture a neutral-grey tabletop where a hand-thrown vase turns slowly as two diffused strip lights travel along its curve, revealing the soft fall-off of highlights and the crisp edge of its foot. That controlled gradient tells a recruiter everything about your technical discipline: even firing, smooth walls, perfect glaze fit. When the light is right, viewers feel they could reach through the screen and trace the texture—exactly the tactile reaction that triggers a click on your portfolio link.
| Lighting setup | Best for | Key gear | Common pitfall |
|---|---|---|---|
| 45° Softbox (single light) | Semi-matte tableware | 60 × 90 cm softbox, white backdrop | Flat look if fill card missing |
| Double diffused strip lights | High-gloss vases | Two 30 × 120 cm strips, diffusion silk | Edge reflections if angle incorrect |
| Natural north-facing window | Textured stoneware | Foam board reflector, tripod | Colour shift on cloudy days |
| Tabletop light tent | Miniatures & jewellery dishes | LED panels, fabric cube | Loss of shadow depth |
Need deeper lighting tweaks? Our detailed lighting hacks for three-dimensional pieces article dives into rim lights, gobos, and gradient backdrops.
4. Composition that sells craft
Angle variety
- Hero shot: 30° elevation, front view.
- Profile: straight side view to show silhouette.
- Detail close-up: 1:1 macro of glaze crystals or handle join.
- Context: hand holding cup or bowl on a placemat to indicate scale.
Background choices
Neutral grey (18 % gray card) minimises colour cast and simplifies batch editing. For earth-toned collections, consider a textured linen or light plywood surface to echo natural materials.
5. Camera settings that capture every speckle
- Aperture: f/8 – f/11 for full object sharpness.
- ISO: 100–200 to avoid grain in gradients.
- Shutter: 1/125 s with flash; slower on tripod under continuous light.
- White balance: custom Kelvin reading (≈ 5200 K) or shoot RAW and correct in post.
- Shoot tethered: live previews highlight hotspots early.
6. Post-processing workflow
Colour accuracy first
Use a colour checker card in the first frame for easy calibration. Match the glaze hue to the physical piece under daylight before touching contrast sliders.
Non-destructive edits
Work in layers. Global exposure, then selective dodge & burn to accentuate grooves. Avoid over-saturation—recruiters distrust images that look synthetic.
Export specs for directories
- Dimension: 2500 px longest edge (print-ready) and 1080 px (web).
- Format: JPEG at 85 % quality, plus one PNG for transparent-background hero.
- File names:
collectionName_pieceName_view.jpgto boost SEO.
7. Upload strategy: timing and metadata
Directories reward fresh uploads with temporary algorithm boosts. Schedule one hero image per day for a week to stay in “new this week” carousels longer. Pair each upload with:
- Keyword-rich alt text (e.g., “cobalt blue cone-10 porcelain coffee mug”).
- Material and firing method tags.
- Size and weight specs for buyers who filter by logistics.
8. Common mistakes that hurt recruiter engagement
- Harsh front flash creates flat surfaces and specular blowouts.
- Busy props steal attention; keep staging minimal.
- Mixed colour temperatures (window plus tungsten) confuse glaze tones.
- No scale indicator; include a hand or ruler in at least one frame.
- Ignoring sustainability cues; if your clay is recycled, show packaging or add a sustainability label callout. Read more in sustainability labels in ceramics.
9. Beyond the shoot: shipping samples safely
Once visuals hook a recruiter, they may request a physical sample. Photograph your packing method—double-boxed, corrugated wrap—to reinforce professionalism. For a full logistics checklist, review shipping fragile ceramics.
10. Keep momentum after publication
Share a time-lapse reel of the shoot on social platforms, link back to the directory listing, and invite feedback. This cross-traffic signals relevance to search engines and human curators alike. If you plan to showcase pieces in person, align your photo release with events—our event strategy that converts clients guide maps the timeline.
FAQ
- Do I need a DSLR or will a modern smartphone suffice?
- High-end smartphones handle social thumbnails, but a DSLR or mirrorless camera with a macro lens captures the micro-textures recruiters zoom into on desktop monitors.
- What backdrop colour works best for multicoloured glazes?
- Mid-grey (#808080) or a seamless light concrete texture prevent colour cast and keep spectral highlights neutral.
- How many images per piece should I upload?
- Three to four: hero, profile, detail, and scale. More images can dilute engagement metrics if users must swipe excessively.
- Is natural light enough for glossy pieces?
- Not always. Add a diffused fill light opposite the window to tame harsh reflections and show even glaze lustre.
- How often should I refresh visuals?
- Update your flagship gallery each quarter or when you release a new collection; algorithms favour consistent activity over bulk dumps once a year.
Mini-Quiz: Are your ceramics photos recruiter-ready?
Next step: turn visuals into contracts
Apply these techniques today, schedule your first upload, and monitor click-through rates. Strong images push you to the top of recruiter shortlists, but follow-up seals the deal—respond quickly, share packing visuals, and maintain the quality bar from lens to doorstep.