Tattoo artist flash sets: curating healed skin photos to reassure prospects
Prospective clients judge tattoo quality less by bold flash art and more by how that art looks six weeks later. In this guide, you'll learn how to collect, edit and publish healed skin photos that prove your line work, colour saturation and after-care advice stand the test of time—turning curious followers into deposit-ready clients.
Why prospects worry about healed results
Flash sheets spark excitement, yet seasoned collectors and first-timers alike scroll forums full of faded ink, blown lines and patchy shading. Showing a gallery of healed tattoos tackles three fears head-on:
- Colour fastness concerns—reds and yellows are notorious for dulling fast.
- Line consistency doubts—fine-line styles can bleed under the skin's surface.
- After-care anxiety—clients need proof that your instructions produce healthy healing.
While studio hygiene video tours remove infection worries, healed images address artistic longevity. Combine both assets and you neutralise 90 % of common objections before the consultation call.
Curate healed skin photos that mirror your flash sets
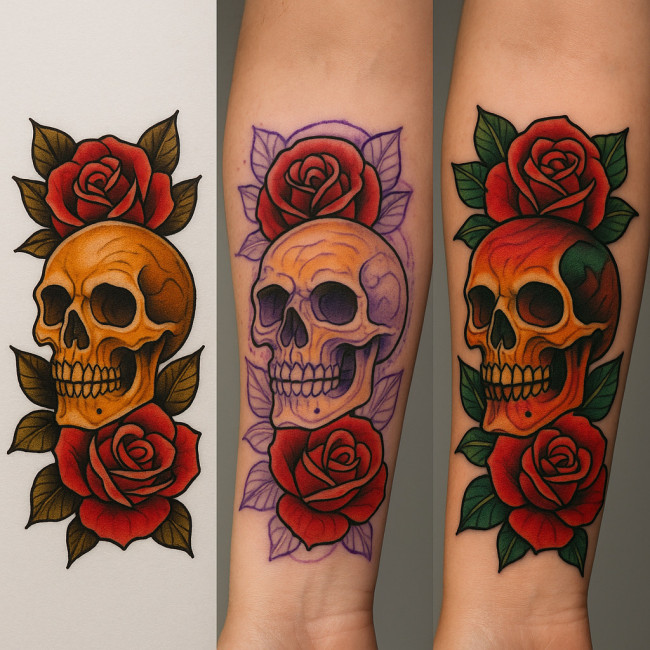
From a marketing perspective, a single victorious image rarely answers every concern a prospective client brings to the DMs. You want a panoramic, deep-dive story that explains in one glance how a line drawing becomes living art that survives laundry friction, beach holidays and seasons of sunblock. That means photographing multiple healed angles—full piece, macro texture, and context shot in ambient light—so browsers can compare pigment behaviour across zones of different epidermal thickness. If your flash sheet stars a botanical composition with delicate negative-space veins, show how those veins remain crisp on elbow creases while the willow-green gradients stay lush where muscle stretches the skin. Packing all of that evidence into one scrolling gallery turns silent sceptics into vocal brand evangelists eager to lock down an appointment.
Shortlist pieces that match your current marketing focus
Publishing every healed piece clutters feeds and confuses style positioning. Instead, align selection with flash sheets you are actively promoting.
- Pick five core motifs (e.g., botanicals, neo-traditional skulls) from this quarter's flash release.
- Audit healed shots from the past 18 months that feature identical line weights and colour palettes.
- Group them into mini-series so prospects instantly connect “design → fully healed outcome”.
Time your follow-up shoots
Three milestones offer the most persuasive evidence:
- Day 14 – Peel window: shows flake-free skin but colours still vivid.
- Month 2: epidermis fully renewed, perfect for checking saturation.
- Month 12: illustrates long-term line integrity after sun exposure cycles.
Encourage clients to book a complimentary photo session at each milestone. Offer a small touch-up credit to raise participation rates above 70 %.
Colour-true editing: keep authenticity over aesthetics
Filters may win Instagram likes, yet they ultimately undermine trust if the healed wrist your client receives looks nothing like the sun-kissed citrus hue they double-tapped online. Authentic colour representation hinges less on expensive gear and more on disciplined workflow. Start by setting a fixed Kelvin value in-camera (around 5500 K), pop a grey card into the first frame and tape neutral seamless paper behind the arm to avoid bounce colour. In post-production, compare the RAW preview to the healed tattoo under north-facing window light; if the milk-sheen scar tissue appears overly matte, you have pushed dehaze too far. The goal is to craft an image so accurate that a client could hold their skin next to the screen and spot no difference. Deliver that level of honesty and even followers who have been burned by over-edited portfolios will convert instantly.
| Editing Step | Best Practice | Common Mistake |
|---|---|---|
| White balance | Use a gray card in every session. | Correcting by eye, leading to overly warm tones. |
| Exposure | Adjust only to match real-life brightness. | Over-exposing to “clean” the background, washing out colour. |
| Sharpening | Apply minimally to preserve pore texture. | Heavy clarity sliders that fake crisp lines. |
| Skin retouch | Remove temporary redness only. | Blurring pores, making ink look sticker-like. |
Legal and ethical sharing
Always secure written consent—especially for healed torso or thigh placements. Adapt the template in our guide on healed-photo release clauses to cover derivative uses like ads or billboards.
Remind contributors they can revoke usage any time; the option reinforces respect and makes sign-off smoother.
Publishing tactics: where and how to display
Portfolio hierarchy
The most convincing layout places flash design, fresh tattoo and healed photo side by side. If you host your gallery on new tattoo portfolio pages, use their triptych slider to keep all three states on one swipe.
Social carousels
- Frame 1 – Flash illustration.
- Frame 2 – Stencil on skin.
- Frame 3 – Fresh finish.
- Frame 4 – Healed result.
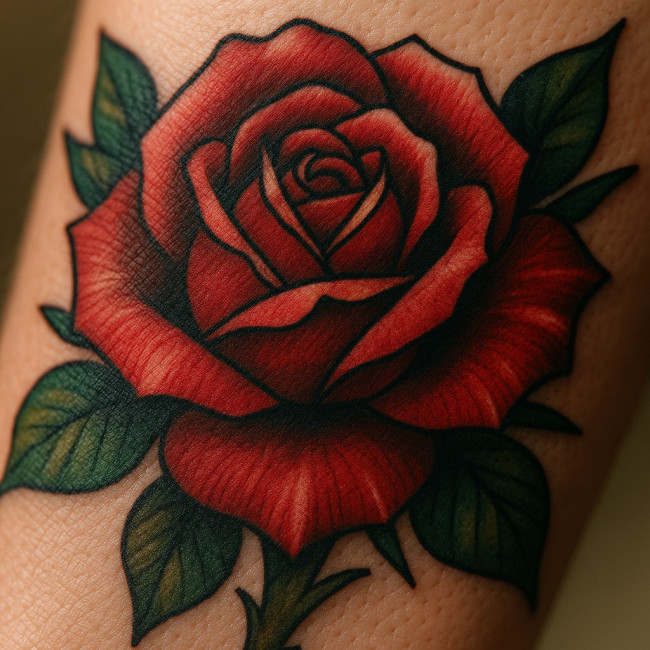
Add alt text such as “healed neo-traditional rose, colours remain rich after six weeks” to aid visually-impaired followers and boost SEO.
Stories & reels
Create 15-second reels showing a dissolve transition from flash sheet to healed arm. Overlay captions summarising ink colours used and healing timeframe. Tag loyal clients—they often reshare, tripling reach.
Case-study workflow: from flash drop to repeat bookings
- Launch day: Release 20 flash designs, collect deposits.
- Tattoo sessions: Document stencil, mid-session and fresh finish.
- Healed check-in: DM clients a calendar link two weeks out.
- Photo session: Shoot under identical light; store filenames with tags “design-healed-60d”.
- Composite post: Publish carousel + blog recap linking to AR tattoo preview tech for clients who still need extra reassurance.
- Referral nudge: Offer 10 % off next piece if they bring a friend after seeing healed evidence.
Guest spots & cross-studio consistency
When travelling, maintain credibility by presenting healed photos from previous guest residencies. Studio owners appreciate transparent quality control, a key point discussed in guest spots best practices.
FAQ
- How many healed photos should I show per flash set?
- Three to five diverse skin tones per design family build stronger proof than a single example.
- Is six weeks the minimum to label a tattoo “healed”?
- Most epidermal healing completes by day 28; however, pigment settles more accurately by week 6, offering clearer evidence of longevity.
- Can I post healed photos without showing the client's face?
- Yes. Crop or mask faces to respect privacy while still demonstrating ink quality—just document this preference in the consent form.
- What camera settings prevent colour shift?
- Shoot RAW at 5500 K with a fixed aperture around f/4 and include a grey card in the first frame for consistent calibration.
- Do healed black-and-grey pieces need the same showcase?
- Absolutely. Clients assessing shading gradients want to see whether mid-tones hold up after skin regeneration.
Quiz: test your healed-photo readiness
Ready to turn your flash drops into fully booked calendars? Start organising healed photo sessions today and watch inquiry rates climb by up to 30 % in the next quarter.